Models


HECMS Models — Trained by Us in Sri Lanka, Shared with the World — AI Models for Wildlife Protection
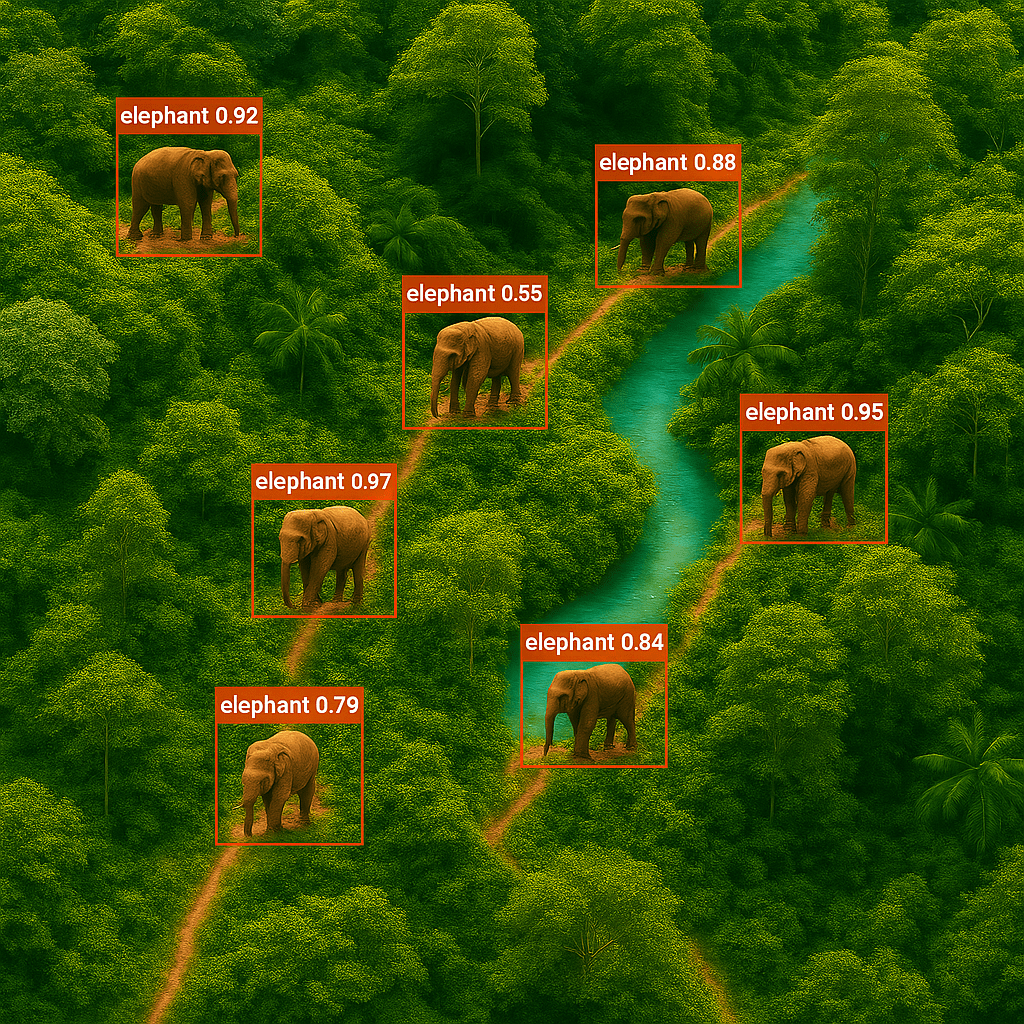
Empower your research with open-source models based on YOLO v8, v11, and v12 architectures — available in all sizes, versions, and formats — engineered for elephant detection, tracking, and ecosystem protection.
Mpowerr HECMS YOLOV8 — Powered by
YOLOv8 Architecture – Reliable & Accurate
YOLOv8 is a modern object detection architecture with an anchor-free design and optimized head structure, delivering reliable accuracy for real-time and edge applications.
| Model Name | Version | Model Size | mAP@0.5 | Task | Action |
|---|---|---|---|---|---|
| Mpowerr HECMS YOLOV8N | Nano | 6.1 MB | 96.97% | Detection | View Model |
| Mpowerr HECMS YOLOV8S | Small | 22.6 MB | 97.05% | Detection | View Model |
| Mpowerr HECMS YOLOV8M | Medium | 49.7 MB | 97.11% | Detection | View Model |
| Mpowerr HECMS YOLOV8L | Large | 83.6 MB | 95.75% | Detection | View Model |
| Mpowerr HECMS YOLOV8X | X-Large | 130.5 MB | 92.42% | Detection | View Model |
Mpowerr HECMS YOLOV11 — Powered by
YOLOv11 Architecture – High-Speed Transformer
YOLOv12 integrates an efficient area attention mechanism into its backbone, delivering enhanced contextual understanding and improved accuracy in high-resolution visual recognition.
| Model Name | Version | Model Size | mAP@0.5 | Task | Action |
|---|---|---|---|---|---|
| Mpowerr HECMS YOLOV11N | Nano | 5.2 MB | 98.52% | Detection | View Model |
| Mpowerr HECMS YOLOV11S | Small | 18.2 MB | 98.89% | Detection | View Model |
| Mpowerr HECMS YOLOV11M | Medium | 38.6 MB | 97.75% | Detection | View Model |
| Mpowerr HECMS YOLOV11L | Large | 48.8 MB | 98.37% | Detection | View Model |
| Mpowerr HECMS YOLOV11X | X-Large | 109.1 MB | 96.49% | Detection | View Model |
Mpowerr HECMS YOLOV12 — Powered by
YOLOv12 Architecture – Attention Centric
YOLOv12 integrates an efficient area attention mechanism into its backbone, delivering enhanced contextual understanding and improved accuracy in high-resolution detection tasks.
| Model Name | Version | Model Size | mAP@0.5 | Task | Action |
|---|---|---|---|---|---|
| Mpowerr HECMS YOLOV12N | Nano | 5.3 MB | 98.75% | Detection | View Model |
| Mpowerr HECMS YOLOV12S | Small | 18.1 MB | 98.89% | Detection | View Model |
| Mpowerr HECMS YOLOV12M | Medium | 38.8 MB | 98.62% | Detection | View Model |
| Mpowerr HECMS YOLOV12L | Large | 51.0 MB | 93.78% | Detection | View Model |
| Mpowerr HECMS YOLOV12X | X-Large | 113.6 MB | 99.22% | Detection | View Model |
Technical Guide: Model Setup & Code Implementation
Learn how to install dependencies, organize model files, and run inference using YOLO with Ultralytics & OpenCV. This guide uses the Mpowerr HECMS YOLOV11N model as an example and covers the complete setup, along with simple code snippets to help you get started quickly.
🔧 Setup
pip install ultralytics
pip install opencv-python
📁 Model Directory
mpowerr-hecms_yolov11n-detect-v1/
├── models/                                # Model Weights
│   └── mpowerr-hecms-yolov11n-detect-v1.pt
├── sample-data/                           # Example data for testing
│   ├── test-images/
│   └── test-videos/
├── training/                              # Training metadata and logs
│   ├── args.yaml
│   ├── results.csv
├── runs/                                  # Auto-generated inference outputs
├── inference-image.py                     # Script for performing inference on images
├── inference-video.py                     # Script for performing inference on videos
└── README.md                              # Project overview and usage instructions
🖼️ Inference on Image - Ultralytics
from ultralytics import YOLO

# Load the YOLOv8 model
model = YOLO("models/mpowerr-hecms-yolov11n-detect-v1.pt")

# ------------------------------------
# 🔍 Image Inference (default example)
# ------------------------------------
print("[INFO] Running inference on image...")

image_results = model.predict(
    source="sample-data/test-images/image-1.png",  # Replace with your own image if needed
    save=True                                       # Saves output image with predictions
)

# Display the image with predictions
image_results[0].show()
🎥 Inference on Video - Ultralytics
from ultralytics import YOLO

# Load the YOLOv8 model
model = YOLO("models/mpowerr-hecms-yolov11n-detect-v1.pt")

# ------------------------------------
# 🎥 Video Inference
# ------------------------------------
print("[INFO] Running inference on video...")

video_results = model.predict(
    source="sample-data/test-videos/video-1.mp4",  # Replace with your video file
    save=True,     # Saves output video with predictions
    stream=True,   # Stream results frame-by-frame
    show=True      # Show video live during inference
)

# Optional: Process each frame result (if needed)
for result in video_results:
    pass  # Add frame-wise processing or custom logic here
🔁 Run Inference Scripts
# Run image inference
python inference-image.py

# Run video inference
python inference-video.py
🖼️ Inference on Image - Ultralytics + OpenCV
import cv2
from ultralytics import YOLO

# Load the YOLOv8 model
model = YOLO("models/mpowerr-hecms-yolov11n-detect-v1.pt")

# ------------------------------------
# 🔍 Image Inference with OpenCV
# ------------------------------------
print("[INFO] Running inference on image with OpenCV...")

# Load the image using OpenCV
image_path = "sample-data/test-images/image-1.png"
image = cv2.imread(image_path)

# Run prediction
results = model.predict(source=image, save=False)

# Get the annotated image from results
annotated_frame = results[0].plot()

# Show the image using OpenCV
cv2.imshow("Detection Result", annotated_frame)
cv2.waitKey(0)
cv2.destroyAllWindows()

# Optionally save the result
cv2.imwrite("sample-data/test-images/image-1-result.jpg", annotated_frame)
🎥 Inference on Video - Ultralytics + OpenCV
import cv2
from ultralytics import YOLO

# Load the YOLOv8 model
model = YOLO("models/mpowerr-hecms-yolov11n-detect-v1.pt")

# ------------------------------------
# 🎥 Video Inference with OpenCV
# ------------------------------------
print("[INFO] Running video inference with OpenCV...")

# Input and output paths
input_path = "sample-data/test-videos/video-1.mp4"
output_path = "sample-data/test-videos/video-1-result.mp4"

# Open the video
cap = cv2.VideoCapture(input_path)

# Get video properties
width  = int(cap.get(cv2.CAP_PROP_FRAME_WIDTH))
height = int(cap.get(cv2.CAP_PROP_FRAME_HEIGHT))
fps    = int(cap.get(cv2.CAP_PROP_FPS))

# Define the codec and create VideoWriter to save the output
fourcc = cv2.VideoWriter_fourcc(*'mp4v')
out = cv2.VideoWriter(output_path, fourcc, fps, (width, height))

while cap.isOpened():
    ret, frame = cap.read()
    if not ret:
        break

    # Run inference on the frame
    results = model.predict(source=frame, save=False, stream=False)

    # Get annotated frame
    annotated_frame = results[0].plot()

    # Display the frame
    cv2.imshow("Video Detection", annotated_frame)

    # Write frame to output file
    out.write(annotated_frame)

    # Press 'q' to quit early
    if cv2.waitKey(1) & 0xFF == ord('q'):
        break

# Release everything
cap.release()
out.release()
cv2.destroyAllWindows()

print(f"[INFO] Saved output video to: {output_path}")This object detection model can be integrated with a wide range of tools and workflows depending on your project needs. Whether you're building real-time applications, analyzing media content, or deploying AI at the edge, the flexibility of this implementation allows it to be adapted across different environments and use cases.
Continue exploring, customizing, and applying this model to create innovative and impactful solutions.
For any issues, feedback, or support, please contact us.